
LinkStation Installation
Introduction
|
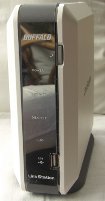
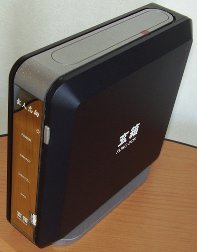
This document describes in depth how to prepare your Buffalo LinkStation for installing NetBSD/sandpoint. In this example we use a LinkStation HD-HLAN, which is the same board as a classic KuroBox. The software installation instructions are valid for the whole LinkStation/KuroBox family:
|
|
Accessing the serial interface
We need a serial console to get access to the firmware. That includes soldering a four pin header onto the board and building (or buying) a serial adapter from the LinkStation's TTL levels to RS232 levels.
Disassemble the HD-HLAN
Unfortunately the LinkStation was not meant to be opened by customers, so Buffalo didn't make it easy. On the top and bottom of the case there is a small tab besides the grey frame, which you have to press down (e.g. with a screwdriver) to be able to move the frame to the front. On the photo below the location is marked red.
After a few millimeters the grey piece snaps free and comes up. You need quite some force to do that, because the shiny front bezel is secured by two hidden screws (one in the top and another in the bottom of the bezel). With enough force and skill you may be able to tear the screws out of the case (fortunately the screws are small). They remain in the shiny bezel. You may want to shorten the screws with a file now.
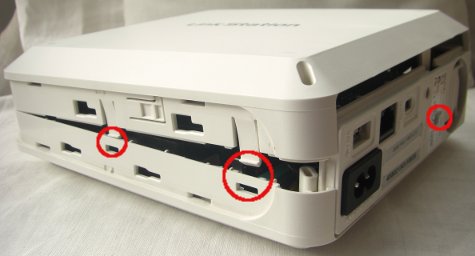
Before the case can be opened you have to remove a screw hidden under a sticker, below the fan (marked on the right side of the picture). Then press the four tabs on the top and bottom to remove the upper half of the case. Remove another four screws to be able to lift the board.
Locate the serial header
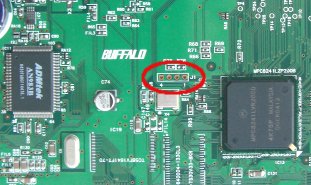
Look out for a 4-pin header, called J1, which
is usually unpopulated. The pin assignments are:
|
|
Solder the missing header and enable write access
I would suggest to solder the 4-pin header on the back side of the
PCB, because it is better accessible when opening the case. It is
advisable to use an angled header to avoid problems closing the
case. You also have to bridge R76, which is unoccupied.
This is needed to enable write-access for the serial console.
You may want to mark pin 1 of the header, before installing the
board again.
|
|
Connect a serial cable
The serial port on LinkStation and KuroBox devices is using 3.3V TTL levels, which have to be converted into regular RS232 levels by a level shifter circuit. If you are not anxious using a soldering iron you find detailed instructions how to build such a converter here:
Make sure that the layout of the plug fits to the pinout of the LinkStation's serial header, as shown above.
Another option is to buy such a converter. There are solutions for a standard RS232 interface and for an USB interface. Look out for:
- RS232 level shifter / breakout board (MAX3232 based)
- USB to TLL serial level shifter / breakout board (FT232 based)
Now you can connect with any terminal program to the LinkStation's
serial console. The easiest approach may be to use NetBSD's
tip(1) command to make a direct console
connection at 57600bps.
# tip -57600 console
Note that when using a serial connection via USB you may have to
make an entry for /dev/ttyU0 in
/etc/remote.
Replace the firmware with U-Boot
The LinkStations run with a proprietary firmware, which doesn't give you any control about the boot process. So our next step is to replace it with U-Boot.
Getting root access
We need root access on the vendor's Linux installation to be able to flash a new firmware. Without the original disk it will become much more difficult. You would either have to find a way to install the system onto a new disk with the help of a second machine, or use the JTAG port to flash the new firmware directly into the chip (in the last case you can skip all sections until the section called “First installation”).
For the KuroBox you can skip this section. The root password is
known to be kuro. Also telnet access is enabled.
The default IP of the KuroBox is 192.168.11.150.
Make a new user over the LinkStation's web interface. We can use it to log in over the serial port.
Log in into the new account and create a CGI file under
/www which makes /etc/passwd
writeable for all users.
BUFFALO INC. Link Station series HD-HLAN (HIDETADA)

BUFFALO login: Besucher
Password:
Linux (none) 2.4.17_mvl21-sandpoint #990 2004xxxx 13:39:00 JST ppc unknown
Besucher@BUFFALO:~$ mkdir /www/cgi-bin3
Besucher@BUFFALO:~$ vi /www/cgi-bin3/exploit.cgi
exploit.cgi should look like this:
#!/bin/sh
chmod 666 /etc/passwd
Then enter the URL
http://mylinkstation/cgi-bin3/exploit.cgi
into your browser. When all went well,
/etc/passwd is writeable now. Edit it with
vi and copy your user password
(/Jg58Gq9427qY in this example) over the current
root password. Now you can log in with the same password into
the root account.
root:dwqa1LabM8BgA:0:0:root:/root:/bin/bash
bin:*:1:1:bin:/bin:
daemon:*:2:2:daemon:/usr/sbin:
sys:*:3:3:sys:/dev:
adm:*:4:4:adm:/var/adm:
sync:*:6:8:sync:/bin:/bin/sync
shutdown:*:7:9:shutdown:/sbin:/sbin/shutdown
halt:*:8:10:halt:/sbin:/sbin/halt
operator:*:12:0:operator:/root:
ftp:*:15:14:ftp:/usr/sbin:/bin/false
nobody:*:99:99:nobody:/home:/bin/sh
Besucher:/Jg58Gq9427qY:101:1000::/home:/bin/bash
The CGI exploit, which I described above, probably does not work with all Linkstation firmware releases. It may fail with versions after 1.45. I was able to do it with 1.47 though. An alternative to this method would be to connect the hard disk to a second machine, which can mount the Linux file system, and replace the root password there.
Flashing U-Boot
To transfer the new firmware onto the LinkStation we first have to
configure FTP access (already enabled for KuroBox). Enable the server
and allow write access for registered users to the shared folders (e.g.
share).
Get an appropriate U-Boot firmware image from http://www.genbako.com/u-boot_loader/ :
Transfer the firmware into the share folder
on the LinkStation.
$ ftp mylinkstation
Connected to 192.168.0.9.
220 BUFFALO FTP server ready
Name (192.168.0.9:user): Besucher
331 Password required for Besucher.
Password:
230 User Besucher logged in.
Remote system type is UNIX.
Using binary mode to transfer files.
ftp> cd share
250 CWD command successful.
ftp> put u-boot-hd.flash.bin
local: u-boot-hd.flash.bin remote: u-boot-hd.flash.bin
229 Entering Extended Passive Mode (|||1045|)
150 Opening BINARY mode data connection for u-boot-hd.flash.bin
100% |***********************************|   170 KiB    6.07 MiB/s    00:00
ETA
226 Transfer complete.
174640 bytes sent in 00:00 (4.86 MiB/s)
ftp> quit
The next step is dangerous. Any fault, like a wrong firmware or an interrupted flashing process, will turn your LinkStation into a brick.
The boot loader firmware can be accessed from Linux through
/dev/fl2. There is no dd so
we will use cat. Log in as root on the serial
console, go to the shared folder where we uploaded the new firmware
and flash it.
root@BUFFALO:~# cd /mnt/share
root@BUFFALO:/mnt/share# ls -l
total 176
-rw-rw-rw-    1 Besucher hdusers    174640 May 13 15:43 u-boot-hd.flash.bin
root@BUFFALO:/mnt/share# cat u-boot-hd.flash.bin > /dev/fl2
The Diag and Disk Full LEDs will flash red during this process. This is normal. After a few seconds the LEDs are off again and the prompt returns. To make sure the process was successful, you should reread the firmware from the flash and compare it with the original. Therefore you have to download the new image, as this Linux installation also got no cmp.
root@BUFFALO:/mnt/share# cat /dev/fl2 > /mnt/share/newfl2
Here the downloaded image differs at character 174641. But that is ok, because the firmware is only 174640 bytes large and we downloaded the whole flash contents.
$ cmp -l newfl2 u-boot-hd.flash.bin
cmp: EOF on u-boot-hd.flash.bin: char 174641, line 891
Reboot your LinkStation and cross fingers. When all went well, the following lines will appear on your serial console:
U-Boot 1.1.4 LiSt 2.1.0 (Sep 21 2006 - 00:22:56) LinkStation / KuroBox

CPU:   MPC8245 Revision 1.4 at 196.608 MHz: 16 kB I-Cache 16 kB D-Cache
DRAM:  64 MB
FLASH:  4 MB
*** Warning - bad CRC, using default environment

        00  0b  1317  0985  0200  ff
        00  0c  1095  0680  0101  ff
        00  0e  1033  0035  0c03  ff
        00  0e  1033  0035  0c03  ff
        00  0e  1033  00e0  0c03  ff
Net:   COMET#0
This precompiled U-Boot defaults to the netcat
console. So we have to wait about 20 seconds before an error is
printed and the console returns to serial.
next_cons_choice: Unexpected code: 0x33
stdin :   serial
stdout:   serial
stderr:   serial
IDE:   Bus 0: OK
  Device 0: Model: SAMSUNG SP1604N Firm: TM100-30 Ser#: S013J20XC0xxxx
            Type: Hard Disk
            Supports 48-bit addressing
            Capacity: 152627.8 MB = 149.0 GB (312581808 x 512)
Boot in 08 seconds ('s' to stop)...
Here you should press s to stop booting and
change some environment variables to make U-Boot default to serial.
=> run ser
=> setenv bootcmd
=> setenv bootdelay -1
=> saveenv
Enter reset to reboot into interactive mode with serial console. At this point we no longer need the original Linux installation and we are ready for NetBSD.
First installation
The altboot bootloader
The altboot(8) program functions as a bridge between
the U-Boot firmware and the NetBSD kernel startup environment.
NAS firmware often provides no means to boot a kernel from disk or
from the network and doesn't initialize all hardware correctly.
We will also use it to pass a bootinfo list to the kernel.
The altboot boot loader has to be loaded and started
using U-Boot. For the first installation we have to load it over the
network with TFTP protocol, using the command
tftpboot. Later we can put
altboot into the flash memory and copy it from
there.
When not already done, enable TFTP on your
working system in /etc/inetd.conf and restart
inetd. Then copy altboot.bin
from the sandpoint distribution into /tftpboot.
On the LinkStation we have to tell U-Boot its client address and
the tftpd server address. Our working system's
server address is 192.168.0.5 in this example, and
the LinkStation is at 192.168.0.102.
=> setenv ipaddr 192.168.0.102
=> setenv serverip 192.168.0.5
=> saveenv
Saving Environment to Flash...
Un-Protected 1 sectors
Erasing Flash...
Flash erase: first = 54 @ 0xfff60000
             last  = 54 @ 0xfff60000
Flash erase: Done
Erased 1 sectors
Writing to Flash... done
Protected 1 sectors
Load altboot.bin into memory. The binary is
relocated at 0x1000000, so type:
=> tftpboot 1000000 altboot.bin
Using COMET#0 device
TFTP from server 192.168.0.5; our IP address is 192.168.0.102
Filename 'altboot.bin'.
Load address: 0x1000000
Loading: ##############
done
Bytes transferred = 70844 (114bc hex)
Boot the INSTALL kernel with altboot
Now you can use altboot to launch the
netbsd-INSTALL_KURO kernel for installing NetBSD.
It is important to take netbsd-INSTALL_KURO
instead of netbsd-INSTALL, because
LinkStation and KuroBox systems have the UARTs swapped, i.e. they
are using the second UART for the serial console.
You may choose to load the installation kernel with TFTP or from NFS.
TFTP was described above and for NFS there is a documentation at
The Network File System. But in both cases you
have to set up a DHCP server, which is explained in the
DHCP Howto
. An appropriate dhcpd.conf entry could
look like this:
        host linkstation {
                hardware ethernet 00:07:40:xx:xx:xx;
                fixed-address 192.168.0.102;
                next-server 192.168.0.5;
                option root-path "/export/linkstation/root";
        }
The root-path option is only needed when using NFS and
should match your exported NFS directory.
Uncompress netbsd-INSTALL_KURO.gz from the
NetBSD/sandpoint distribution and copy it into the NFS or TFTP
directory.
Then start the DHCP, NFS or TFTP server and boot the installation kernel
from the firmware either with
=> go 1000000 tftp:netbsd-INSTALL_KURO
or from NFS:
=> go 1000000 nfs:netbsd-INSTALL_KURO
Our bootloader configures the hardware, determines the IP address, loads the kernel via network and launches it:
## Starting application at 0x01000000 ...

>> NetBSD/sandpoint altboot, revision 1.5 (Fri Feb 18 23:21:15 CET 2011)
>> KuroBox, cpu 195 MHz, bus 97 MHz, 64MB SDRAM
channel 0 present
wd0: <SAMSUNG SP1604N> DMA LBA LBA48 152627 MB
wd0: no disklabel
MAC address 00:07:40:xx:xx:xx
100Mbps-FDX
loading "netbsd-INSTALL_KURO" 5142988+110988=0x502f98
entry=0x00090000, ssym=0x00592b58, esym=0x00592f98
ksyms: Symbol table not found
ksyms: String table not found
ksyms: Perhaps the kernel is stripped?
Copyright (c) 1996, 1997, 1998, 1999, 2000, 2001, 2002, 2003, 2004, 2005,
    2006, 2007, 2008, 2009, 2010, 2011
    The NetBSD Foundation, Inc.  All rights reserved.
Copyright (c) 1982, 1986, 1989, 1991, 1993
    The Regents of the University of California.  All rights reserved.

NetBSD 5.99.45 (INSTALL_KURO) #0: Thu Feb 10 11:36:46 UTC 2011
	builds@b6.netbsd.org:/home/builds/ab/HEAD/sandpoint/201102100300Z-obj/home/builds/ab/HEAD/src/sys/arch/sandpoint/compile/INSTALL_KURO
total memory = 65536 KB
avail memory = 57984 KB
OpenPIC Version 1.2: Supports 1 CPUs and 26 interrupt sources.
mainbus0 (root)
cpu0 at mainbus0: 8245 (Revision 0.4), ID 0 (primary)
cpu0: HID0 0x90c000<DOZE,DPM,ICE,DCE>, powersave: 1
eumb0 at mainbus0
com0 at eumb0 unit 1: ns16550a, working fifo
com0: console
ociic0 at eumb0
iic0 at ociic0: I2C bus
rs5c372rtc0 at iic0 addr 0x32: RICOH RS5C372[AB] Real-time Clock
satmgr0 at eumb0 unit 0: button manager (kurobox)
pci0 at mainbus0 bus 0
pchb0 at pci0 dev 0 function 0
pchb0: vendor 0x1057 product 0x0006 (rev. 0x14)
tlp0 at pci0 dev 11 function 0: ADMtek AN985 Ethernet, pass 1.1
tlp0: interrupting at irq 16
tlp0: Ethernet address 00:07:40:xx:xx:xx
ukphy0 at tlp0 phy 1: OUI 0x00e092, model 0x0001, rev. 1
ukphy0: 10baseT, 10baseT-FDX, 100baseTX, 100baseTX-FDX, auto
cmdide0 at pci0 dev 12 function 0: Silicon Image 0680 (rev. 0x02)
cmdide0: primary channel wired to native-PCI mode
cmdide0: using irq 17 for native-PCI interrupt
atabus0 at cmdide0 channel 0
cmdide0: secondary channel wired to native-PCI mode
atabus1 at cmdide0 channel 1
ohci0 at pci0 dev 14 function 0: vendor 0x1033 product 0x0035 (rev. 0x43)
ohci0: interrupting at irq 19
ohci0: OHCI version 1.0
usb0 at ohci0: USB revision 1.0
ohci1 at pci0 dev 14 function 1: vendor 0x1033 product 0x0035 (rev. 0x43)
ohci1: interrupting at irq 19
ohci1: OHCI version 1.0
usb1 at ohci1: USB revision 1.0
ehci0 at pci0 dev 14 function 2: vendor 0x1033 product 0x00e0 (rev. 0x04)
ehci0: interrupting at irq 19
ehci0: companion controllers, 3 ports each: ohci0 ohci1
usb2 at ehci0: USB revision 2.0
biomask 8000038 netmask 8000038 ttymask 8000038
uhub0 at usb0: vendor 0x1033 OHCI root hub, class 9/0, rev 1.00/1.00, addr 1
uhub1 at usb1: vendor 0x1033 OHCI root hub, class 9/0, rev 1.00/1.00, addr 1
uhub2 at usb2: vendor 0x1033 EHCI root hub, class 9/0, rev 2.00/1.00, addr 1
wd0 at atabus0 drive 0: <SAMSUNG SP1604N>
wd0: 149 GB, 310101 cyl, 16 head, 63 sec, 512 bytes/sect x 312581808 sectors
boot device: tlp0
root on md0a dumps on md0b
root file system type: ffs
erase ^H, werase ^W, kill ^U, intr ^C, status ^T
Terminal type? [vt100]
Just follow the usual procedure to install a NetBSD system.
Post installation steps
After a successful installation you want to make the system boot
standalone when switched on, without the need for a serial console.
So you have to modify the bootcmd in U-Boot's environment
and write the altboot.bin binary to the Flash ROM.
On the LinkStation and KuroBox the last 128K or the Flash ROM are
known to be unused, so we can put altboot there.
Load altboot.bin into memory at
0x1000000 again, as explained above, and execute
the following commands to write it to Flash ROM:
=> protect off fffe0000 +20000
Un-Protected 9 sectors
=> erase fffe0000 +20000

Flash erase: first = 62 @ 0xfffe0000
             last  = 70 @ 0xffffe000
Flash erase: Done
Erased 9 sectors
=> mw.b 1000000 ff 20000
=> tftp 1000000 altboot.bin
Using COMET#0 device
TFTP from server 192.168.0.5; our IP address is 192.168.0.102
Filename 'altboot.bin'.
Load address: 0x1000000
Loading: ##############
done
Bytes transferred = 70844 (114bc hex)
=> cp.b 1000000 fffe0000 20000
Copy to Flash... done
=> cmp.b 1000000 fffe0000 20000
Total of 131072 bytes were the same
=> protect on fffe0000 +20000
Protected 9 sectors
=> reset
Finally adapt the bootcmd environment string to
autoboot altboot and start the
netbsd kernel (which is the default name) from
wd0 on each reboot:
=> setenv bootcmd cp.b fffe0000 1000000 20000\; go 1000000 wd0:netbsd
=> setenv bootdelay 3
=> saveenv
The \ is important for setenv not to
misinterpret the ; as the end of the command.
Have fun with your mini NetBSD server!
Back to NetBSD/sandpoint Port Page